Install Dime.Scheduler
Don't forget about the prerequisites and upgrade guide before runnning the installer.
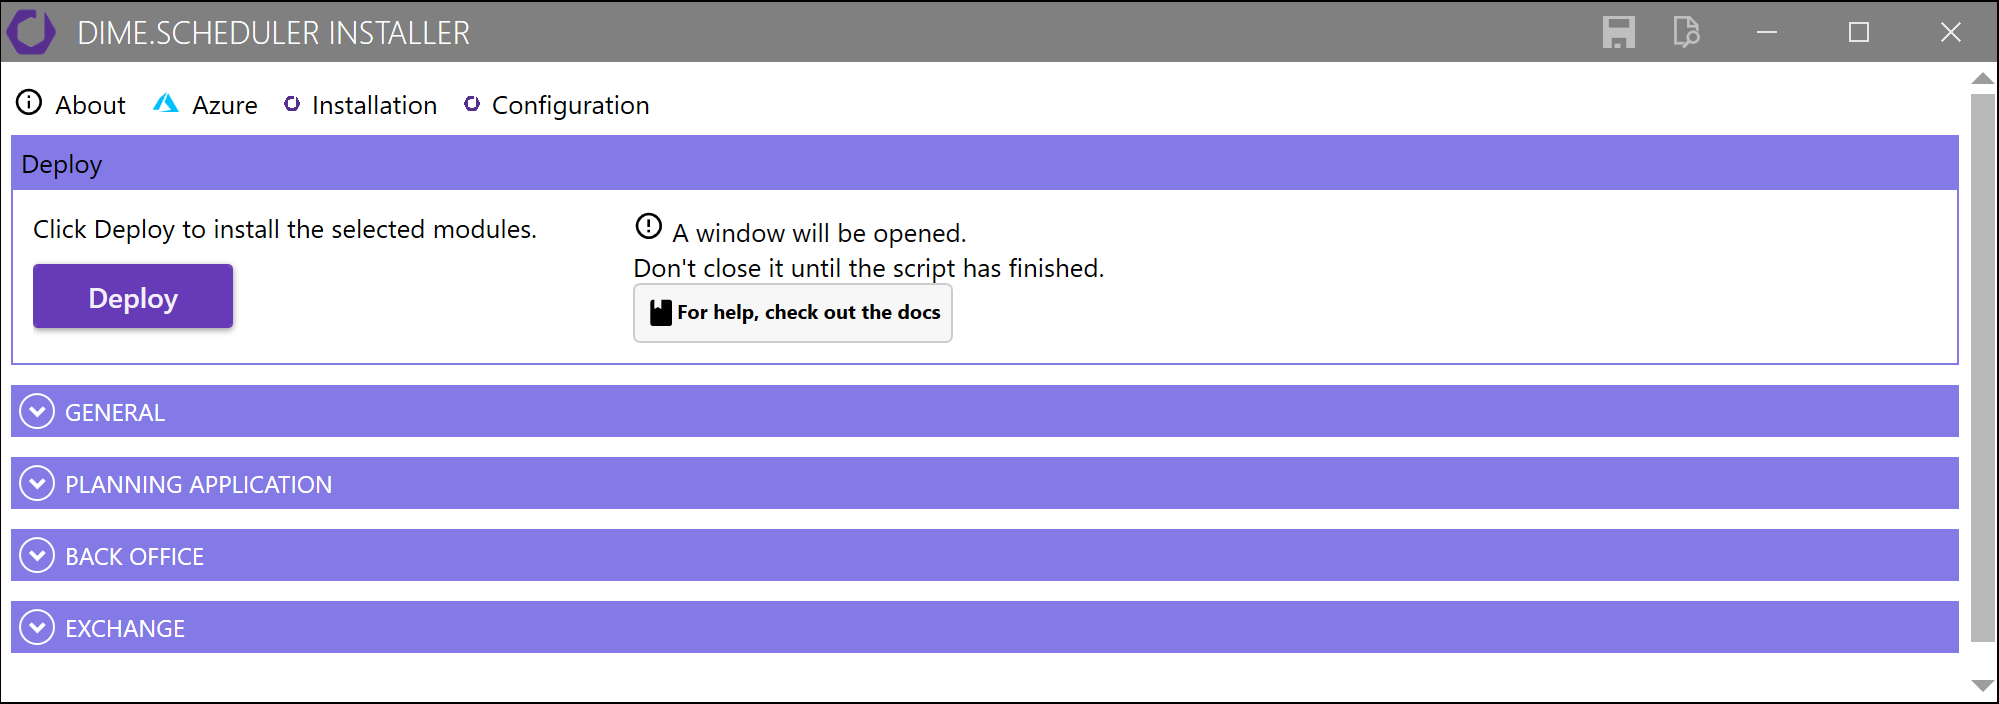
Deployment overview
For this edition of the installer, it is necessary to run the application on the virtual machine itself in order to install Dime.Scheduler.
Copy the compressed file to a folder on the target machine. We recommend that you use a short path like C:\ds to avoid any long file path issues down the road.
If you install Dime.Scheduler for the first time on this machine, there is very little you need to do. The default parameters are set according to the best practices, so unless you have a good reason, you can leave them as they are. Or, if you are doing an update, you could load a preconfigured configuration file.
Sections
There are five sections in this installation tab. They are all related to the deployment but they're split up by application.
There's one exception: the general section. Cross-cutting configuration elements such as service accounts and ancillary installation steps are gathered here.
Modules
It is our sincere hope that - by the way the user interface is designed - you understand that the installer is modular; you only install what you want to install. In each section, you will find a modules section:

Depending on the node, some checkboxes are ticked by default. For example, we assume that you want to install the planning application and the connector to Microsoft Dynamics 365 Business Central or Dynamics NAV. The settings can easily be overwritten by changing their values, or by simply loading a preconfigured installation file to overwrite all installation settings.
The subsequent fields and groups are targeted towards the installation of that particular node, and that usually means we need to know about database names, web site names, installation paths and service account names.
Parameters
The deployment areas - more or less - correspond to the following categories:
- Web site
- Database
- Windows Service
General installation parameters
As mentioned in the introduction of this article, there are a few general fields which are used throughout the setup. They can be found in the general tab:
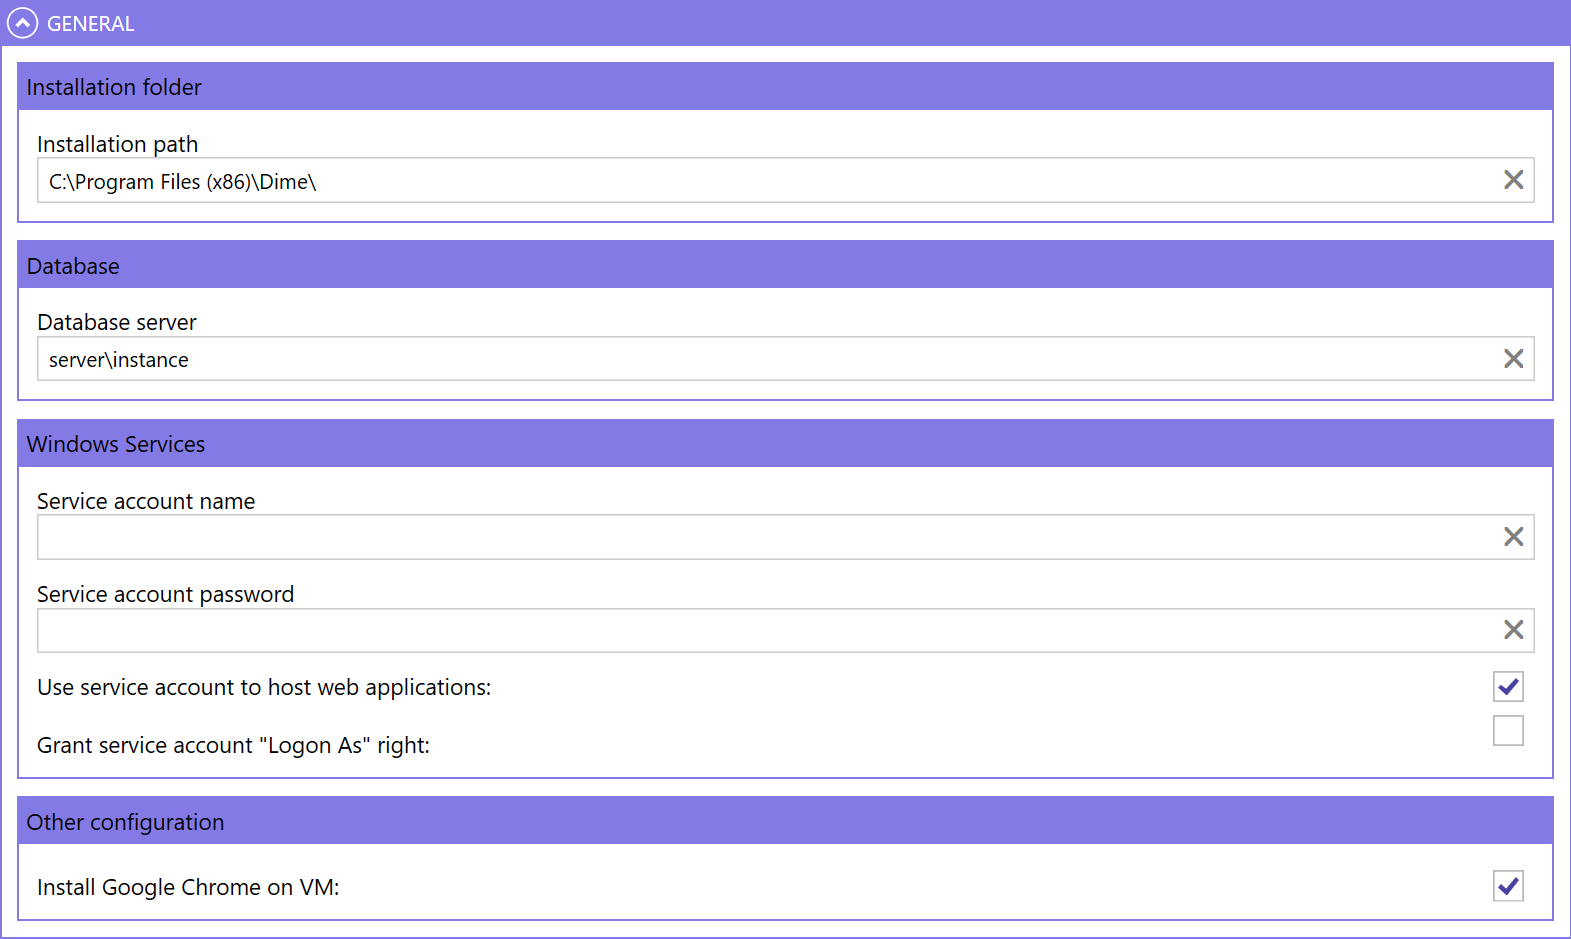
These fields are picked up by the installers of the applications. For example, instead of copying the database server for each database, you need to fill it out only once. Likewise for the service account: one service account is used to run all Windows Services. This is not mandatory but it facilitates the deployment process dramatically.
Installation folder
This is the path where the Windows Services will be deployed to.
Database server
For on-premise deployments, we have never encountered anyone who has deployed the different Dime.Scheduler databases on different servers. Because of this, you only need to enter the database server once.
Windows Services

Service account
For on-premise deployments, our advice remains the same: we recommend that you use a service account to run the Windows Services. For cloud-based instances (Azure SQL and Microsoft Dynamics 365 Business Central on Azure), the local administrator account will do just fine. You can use the same credentials as the ones you submitted in the Azure deployment step.
It is important to know that you must use the full name of the user, that is, with the domain. In other words, use this format: VM NAME\USER NAME. For example: ds-iis-vm\dimescheduler.
In addition, you can opt to use the service account to host the web applications as well. Finally, if you hadn't already done so yourself, we can grant logon as rights to the service account so it can be used to host the Windows services.
To deploy the application successfully, you need to modify the following configuration items in this section:
Use service account to host web applications
When set to true, the service account will be used to host the application pool instead of the traditional ApplicationPoolIdentity.
Grant service account Logon As right
When set to true, the service account will be granted the "Logon As" permission on this computer.
Other configuration
Install Google Chrome
To make local internet access easier and faster, we provide the option to install Google Chrome on this machine. Obviously, this option is entirely optional. But we prefer Google Chrome to our fallen hero, Internet Explorer 11, on the server.
Deploy planning application
The parameters are divided in the following distinct areas:
To deploy the application successfully, you need to modify the following configuration items:
Obviously, the other fields may be modified too. However, leaving them unmodified will not necessarily fail the installation.
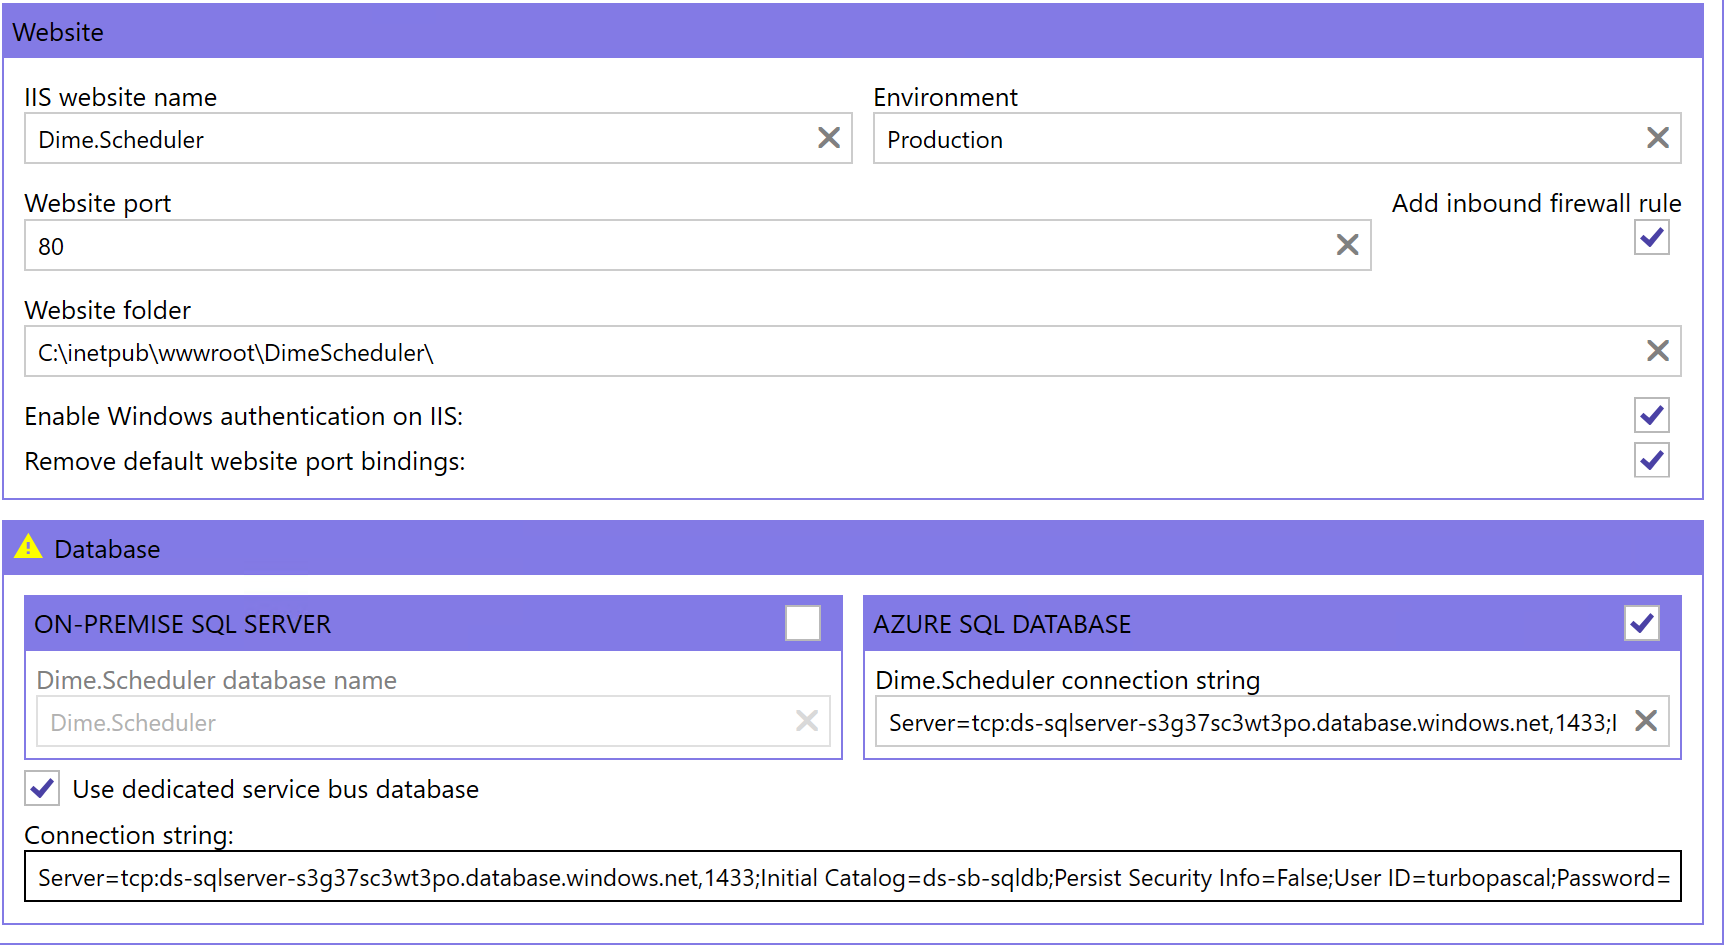
The website section is mainly concerned with getting Dime.Scheduler deployed to an IIS website. In addition, it also has two static configuration items: environment and the website base URI.

If this module is selected, the installer will handle the entire website deployment process, that involves the installation of the web deploy framework, creation of event log sources, IIS application pool, IIS Website, and the planning web application itself.
Website
Planning application IIS Website name
This is the name of the IIS website and application pool.
Environment
This value sets the environment variable of this deployment. The environment variable allows for multiple instances of the Dime.Scheduler planning applications on the same machine. With this variable, the back office knows what to do. 8
Planning application website port
This is the port of the planning web application.
Add inbound firewall rule for planning application
When set to true, an inbound firewall rule will be added for the port.
Planning application website folder
The absolute path of the website directory.
Enable IIS Windows Authentication
When this switch is turned on, Windows Authentication for the website will be switched on:

If necessary, the script will automatically adjust the feature delegation of "Authentication - Windows" to Read/Write:

Remove default website port bindings
This flag is particulary useful for brand new web servers. By default, the empty "Default Web Site" uses the :80 port in new web servers. By switching on this flag, the installer will remove the :80 port binding from any website that uses this and will assign them to the Dime.Scheduler website that you are about to deploy.
Database
If this module is selected, the installer will automatically download and install the bits and bytes to deploy databases (i.e. SQLPackage).
Database type
There are two options here: you either use Azure SQL databases or use an on-premise database server.

After deploying the database, a default login will be created to access Dime.Scheduler 5. Use the following credentials to log in:
- Username: admin
- Password: Admin!1
Warning: Mind the casing if your SQL database has a case sensitive collation.
Messaging database
It is also possible to use a dedicated database to host the tables that store messaging information that are picked up by the plugins. This is particularly useful when system engineers want to host multiple instances of Dime.Scheduler (like test, UAT and production environments) on the same machine and/or database server 7. When the 'Use decicated service bus database' option is ticked, you can enter the connection string for that database.
Azure SQL
If you decide to use Azure SQL databases, make sure you don't forget to tick the checkbox in the Azure SQL database header; otherwise the local database option will be used. The only values you need to provide here are the database connection strings. To do this, head back to the portal, locate your resource group and select a database.
Click the 'Show database connection strings' link:

Copy the connection string to your clipboard. However, this connection string is not yet complete: make sure to replace the {your_password} with the password of the administrator credentials that you submitted in the Azure deployment step.

Paste the connection string in the corresponding text field in the installer. If you used the default database names, then you can paste the same connection string in both text fields. You only need to modify the catalog: the first text field should indicate 'ds-sqldb' whereas the second should show 'ds-sqldb'.
If you used the Azure deployment installer, you don't need to do any security configuration: the virtual machine is able to connect to the Azure SQL databases.
To access the databases yourself, you can use the credentials of the administrator for the Azure VM.
Dedicated SQL server
If you select the on-premise database option, we will create the connection string for you. Provided that you filled out the database server and the database name, we'll take care of the rest.
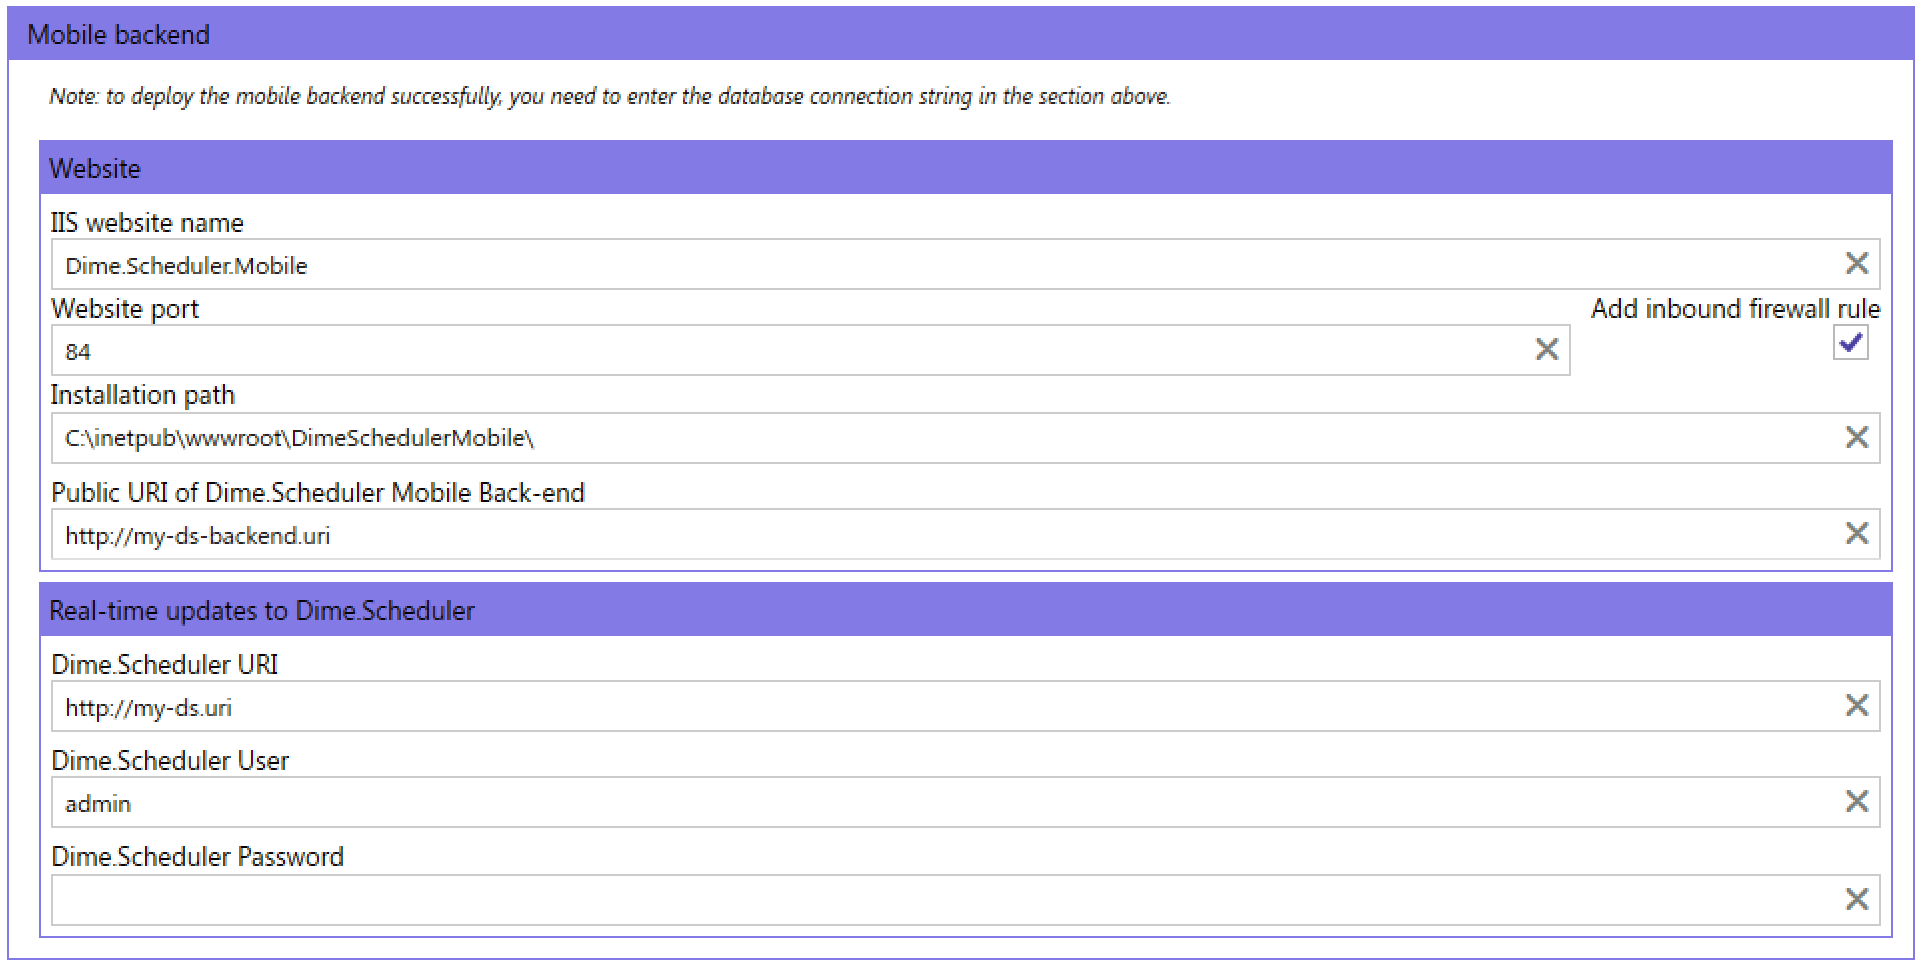
Mobile backend
Dime.Scheduler 2022.2.0 comes equipped with a brand-new mobile app. To learn more about the mobile itself, continue here.
This section is very similar to the others in the installer, because the backend is also a web application that all mobile devices will connect to in order to fetch and write data from and to Dime.Scheduler. It is therefore crucial that this web application is ⚠️publicly accessible ⚠️.
There are two parts to the installation of the mobile backend:
- The first subsection is concerned with deploying the service itself.
- The second section is in charge of setting up a real-time connection with the main planning application.
Familiar with Docker? The mobile backend is also available on Docker! Get started here.
Mobile backend
An IIS web site is created using the parameters that are provided in this section:
- Name
- Port (with the possibility to open this port)
- The directory to install the web app
Furthermore, in order to safely generate JSON Web Tokens (JWT), you'll need to provide the publicly accessible URI of the mobile backend.
Real-time connection
If you wish to use the location tracker and geocoding service, then you'll need to fill out this section as well. Simply provide the URI, a Forms user account and password of Dime.Scheduler's main application, and you're good to go.
Deploy back office
Both back office and most other plugins have the same setup. Both applications are plugins to back office systems and as such they also have the same installation procedure.

If this module is selected, the installer will handle the entire website deployment process, that involves the installation of the web deploy framework, installation of the ASP.NET Core Windows Hosting Bundle, creation of event log sources, IIS application pool, IIS Website, and the back office web application itself.
Website
Back Office IIS Website name
This is the name of the IIS website and application pool.
Back Office website port
This is the port of the back office web application.
Add inbound firewall rule for Back Office
When set to true, an inbound firewall rule will be added for the port.
Back Office website folder
The absolute path of the website directory.
Database
If this module is selected, the installer will automatically download and install the bits and bytes to deploy databases (i.e. SQLPackage). You have two options here: you either use Azure SQL databases or use an on-premise database server.

After deploying the database, a default login will be created to access this plugin 5. Use the following credentials to log in:
- Username: backoffice@dimescheduler.com
- Password: Admin!1
Warning: Mind the casing if your SQL database has a case sensitive collation.
Azure SQL
If you decide to use Azure SQL databases, make sure you don't forget to tick the checkbox in the Azure SQL database header; otherwise the local database option will be used. The only values you need to provide here are the database connection strings. To do this, head back to the portal, locate your resource group and select a database.
Click the 'Show database connection strings' link:
Copy the connection string to your clipboard. However, this connection string is not yet complete: make sure to replace the {your_password} with the password of the administrator credentials that you submitted in the Azure deployment step.
Paste the connection string in the corresponding text field in the installer. If you used the default database names, then you can paste the same connection string in both text fields. You only need to modify the catalog: the first text field should indicate 'ds-sqldb' whereas the second should show 'ds-bo-sqldb'.
If you used the Azure deployment installer, you don't need to do any security configuration: the virtual machine is able to connect to the Azure SQL databases.
Dedicated SQL server
If you want to use your own on-premise SQL database, the procedure is almost the same: we just need the database server and database names and we'll assemble the connection string for you. The database server can be found in the general section.
Deploy Exchange connector
This tab is an extension of the main installation tab and as such, it is included in the installation process. The look and feel is identical: it is divided in a modules section and parameters section.
Before the Office 365 Exchange connector can be deployed, the administrator must ensure that an application is registered on Azure AD with the following permissions of the Graph API. Continue here for instructions how to create an Azure AD App.
Only then will the administrator be able to obtain the application's id and secret. If Azure AD authentication is used for Dime.Scheduler, the same application can be used.
Exchange modules
What is selected in the modules determine which values in the parameters section are picked up and used during the deployment.
There are three elements in the Exchange connector: a web application, database and windows service:

Exchange parameters
The subsequent parameter groups also reflect this architecture:
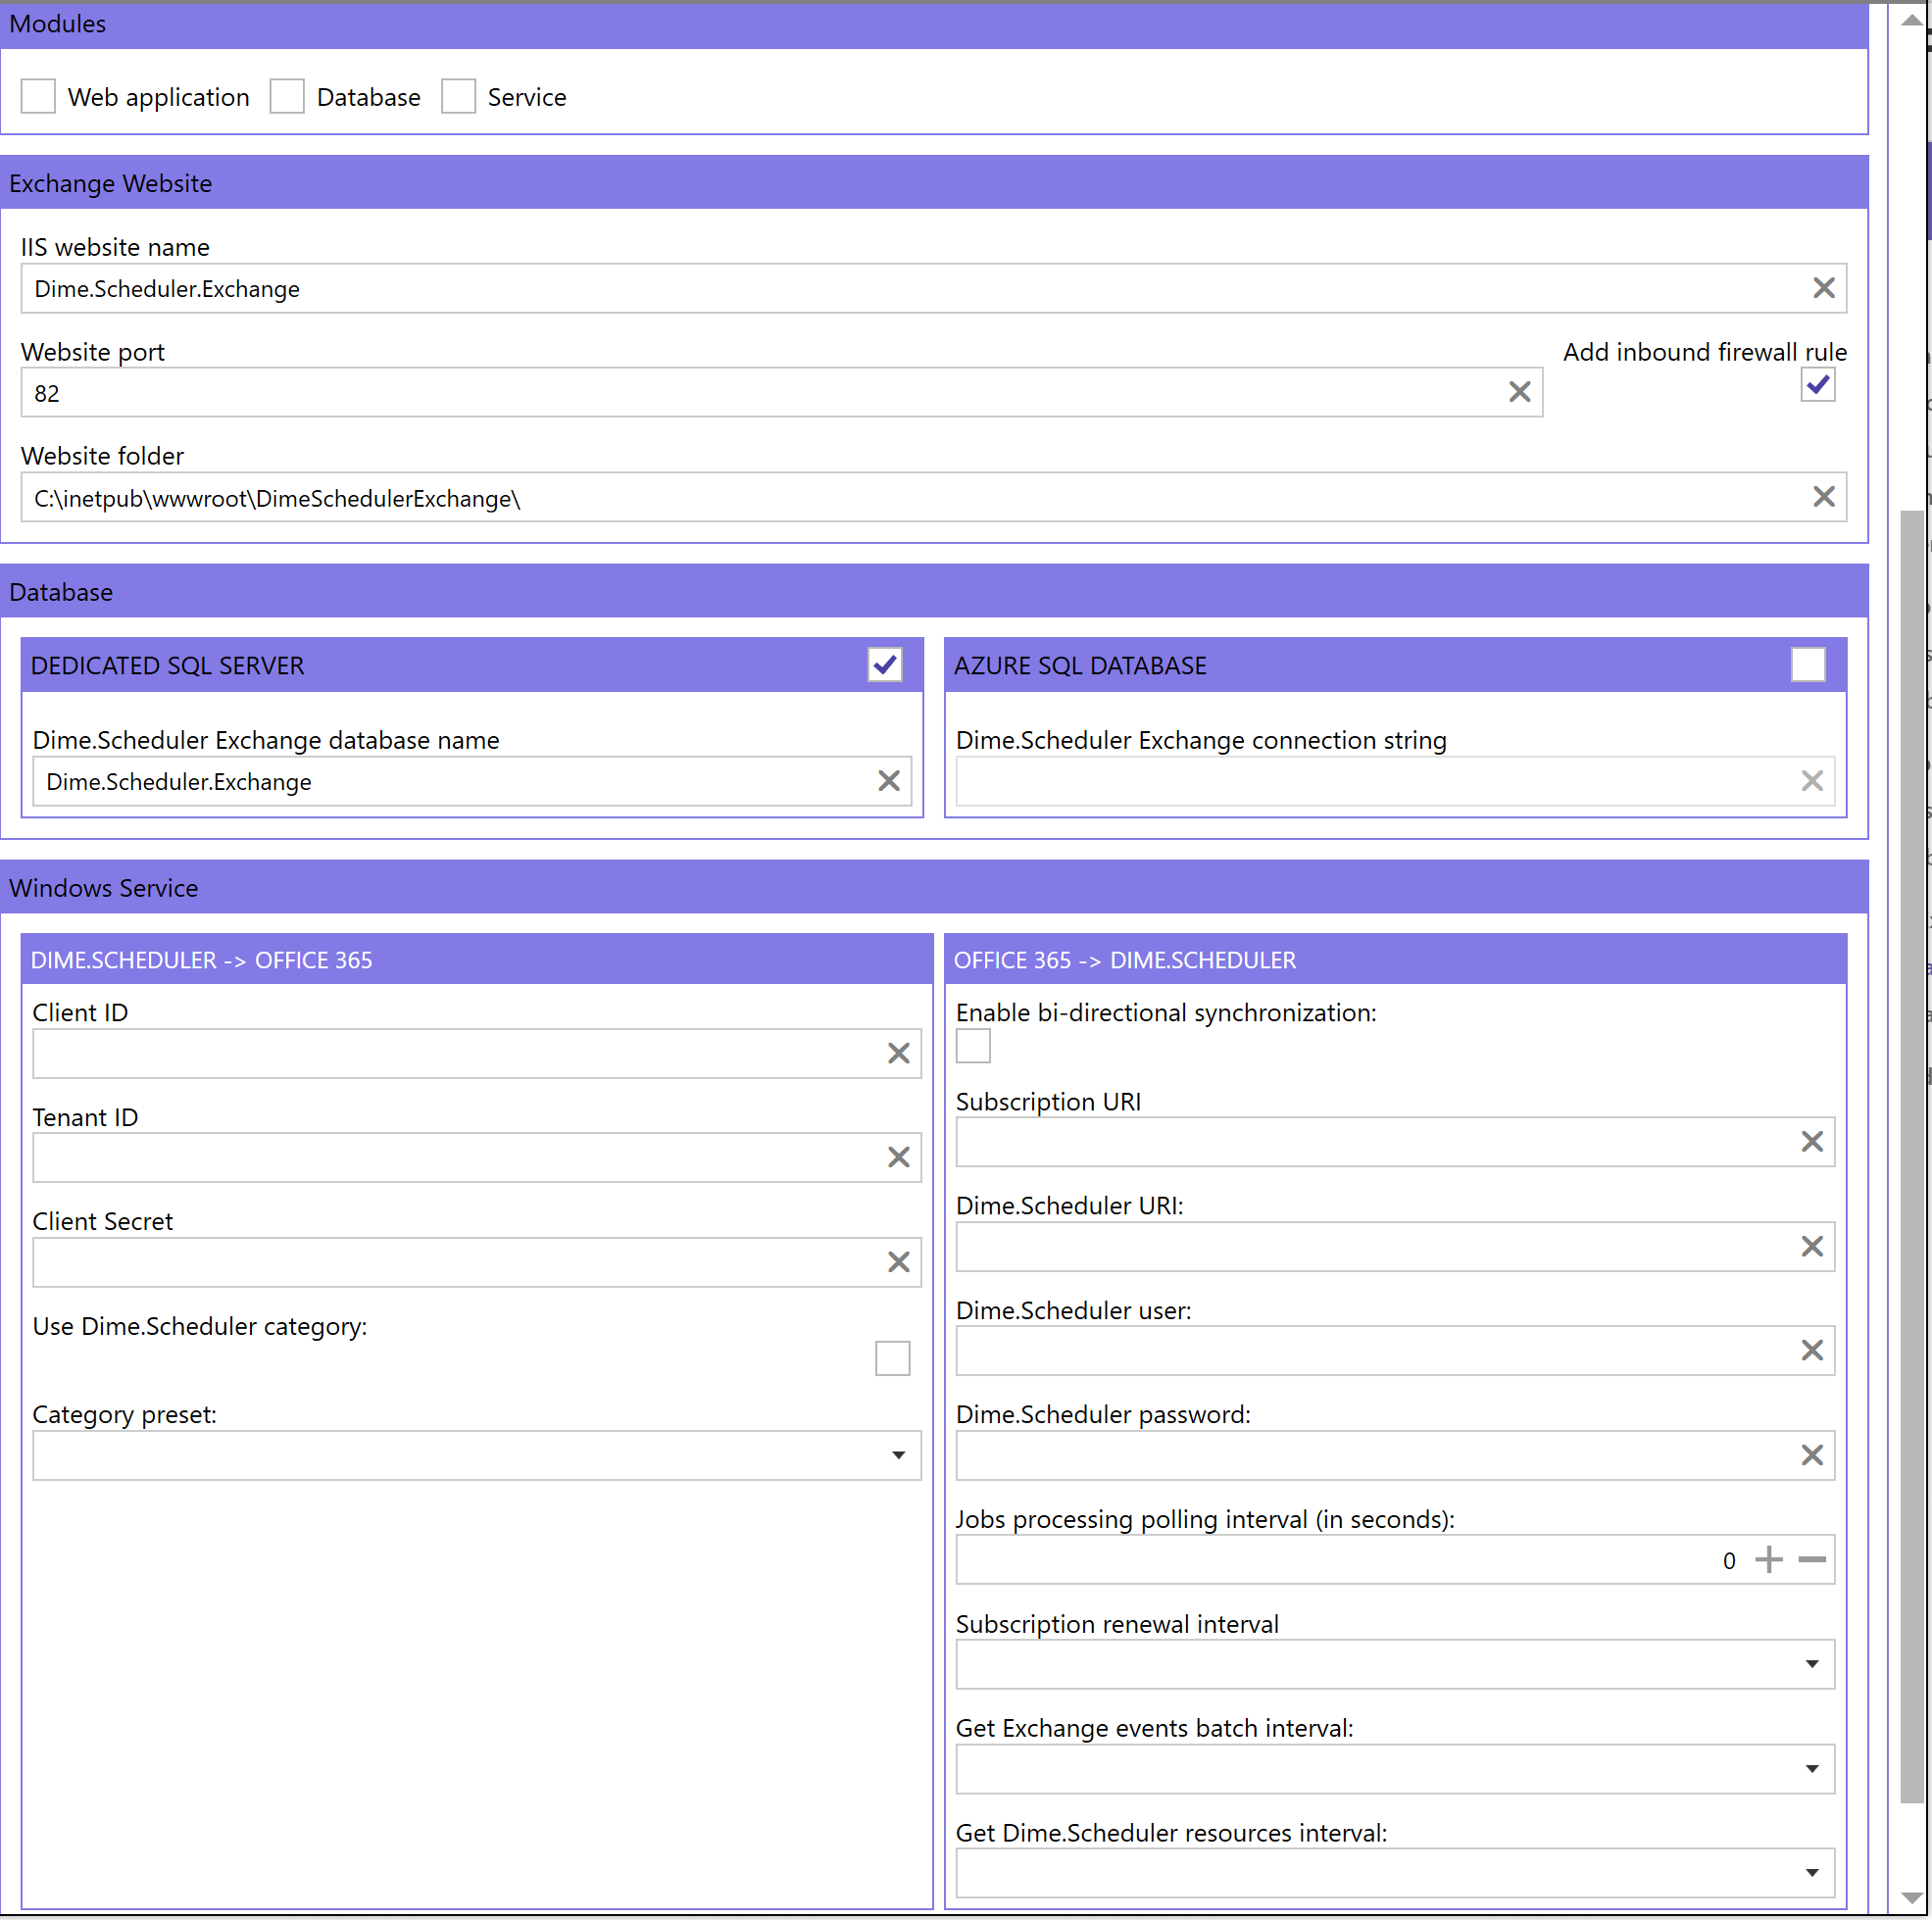
The following configuration parameters are available in the installer.
- Website
| Name | Default value | Is default value compatible |
|---|---|---|
| IIS Website name | Dime.Scheduler.Exchange | ✔️ |
| Website port | 82 | ✔️ |
| Add inbound firewall rule | ✔️ | ✔️ |
| Website folder | C:\inetpub\wwwroot\DimeSchedulerExchange | ✔️ |
- Database
| Name | Default value | Is default value compatible |
|---|---|---|
| Dime.Scheduler Exchange database name | Dime.Scheduler.Exchange | ✔️ |
| Dime.Scheduler Exchange connection string | Empty | ✔️ ❌ when Azure SQL is selected |
- Dime.Scheduler -> Exchange (Windows Service)
| Name | Default value | Is default value compatible |
|---|---|---|
| Client ID | Empty | ❌ |
| Tenant ID | Empty | ❌ |
| Client Secret | Empty | ❌ |
| Use category | false | ✔️ |
| Category preset | Empty | ❌ |
- Exchange -> Dime.Scheduler
| Name | Default value | Is default value compatible |
|---|---|---|
| Enable bidirectional synchronization | false | ✔️ |
| Subscription URI | Empty | ❌ |
| Dime.Scheduler URI | Empty | ❌ |
| Dime.Scheduler user | Empty | ❌ |
| Dime.Scheduler password | Empty | ❌ |
| Jobs processing polling interval (in seconds) | 10 seconds | ✔️ |
| Subscription renewal interval | Every day | ✔️ |
| Delta events synchronization job interval | Every five minutes | ✔️ |
| Get Dime.Scheduler resources interval | Every day | ✔️ |
| Date range to track appointments | -7 days to + 365 days | ✔️ |
Exchange website and database
The configuration is almost identical to the other plugins. See here for more information.
Bidirectional synchronization: Dime.Scheduler to Exchange
To notify Exchange of changes in Dime.Scheduler, we need the following information:
- The client id of the Azure AD application
- The client secret of the Azure AD application
- The tenant id
These items are boilerplate and are necessary for most Azure AD applications.
In addition, you can pick a category to label appointments from Dime.Scheduler. If the "Use Dime.Scheduler category" checkbox is checked, the value in the "Category preset" will be used to mark Dime.Scheduler appointments:

Bidirectional synchronization: Exchange to Dime.Scheduler
Getting records back to Dime.Scheduler requires a different approach. To listen to changes in the resources' Outlook calendars, a webhook (or what Microsoft calls a Graph Subscription) needs to be defined.
The Subscription URI parameter is the publicly accessible URI to the Exchange website. Microsoft requires that this webhook is SSL-protected. For example: https://contoso.dimescheduler.com:82 would be an acceptable endpoint URI for the Graph API. You can test the webhook by navigating to the relative path api/Exchange (for example https://contoso.dimescheduler.com:82/api/Exchange) which returns a simple string. 6 You can also use the 'Test connection' button. Of course, this test will only succeed after the Exchange website has been deployed.
Every time the webhook is invoked, the Exchange connector will send those records back to Dime.Scheduler. To do this, three parameters need to be provided:
- The URI to Dime.Scheduler. This does not need to be publicly accessible, so long as the Exchange connector can access Dime.Scheduler. For example:
https://contoso.dimescheduler.com - The Dime.Scheduler user: you could use the same credentials as the user you provided in the Business Central FastTrack wizard. Otherwise, any Forms user with the administrator role in Dime.Scheduler will do.
- The Dime.Scheduler password: needless to say, in this field you need to fill out the user's password.
In addition, there are a few jobs in the background which make the synchronization airtight:
- Subscription renewal: subscriptions expire in 3 days after creation. This job loop throughs the list of resources and renews the subscriptions to guarantee real-time messaging between Exchange and Dime.Scheduler
- Exchange event sync batch : this job fetches the deltas to catch any events that may have slipped through the cracks. The slider below allows you to configure the date range that the delta service should apply.
- Dime.Scheduler resource sync batch: fetches resources that have the 'Exchange integration enabled' flag set to true.
These three jobs can be scheduled according to a certain interval. The corresponding fields allow you to set that interval, varying from instant (0 seconds) to 24 hours.
Finally, the interval at which events from Exchange to Dime.Scheduler are sent, can be set. This is a configurable option because the underlying mechanism polls the Dime.Scheduler Exchange database and could therefore become resource-intensive. In the 'Jobs processing polling interval' field, you can set how often this polling should be done.
Deploy webhook connector
The webhook connector has a fairly straightforward setup: it just needs a service to run. There's currently no database or management application available.
Load and save installation parameters
In the installation tab, you will find two buttons in the top right corner of the window:

These buttons allow you to save and load installation files. For example, if you installed Dime.Scheduler for the first time with your new customer, you can save the settings to a file and use those settings the next time you do an update of the application.

⚠️ The configuration files are stored in plain text. This includes passwords and other sensitive information.
- The environment variable is deprecated and will be removed in a future version.↩
- We cannot urge you enough to change the password as soon as possible, especially when the web application is out in the open.↩
- We recommend against this pattern. It is a best practice to have one environment per web server.↩
- For testing purposes, you could consider using tunnels such as ngrok and localtunnel to expose the website to the internet. It also eliminates the need to set up SSL for that particular website. For example, run
npx localtunnel --port 82(you need to install NodeJS first) orngrok http http://contoso.dimescheduler.com:82(needs the ngrok to be present on the server and its path added to the environment variables) on the web server and you'll get a whacky URL in return likehttps://happy-firefox-29.loca.lt, which you can then paste in the Subscription URI field.↩