Deploy Azure resources
There is no magic involved with our installer to create an Azure solution. We just use the tools that Microsoft provides, and for Azure that is the Azure Resource Manager combined with Azure Resource Manager Templates and an Azure PowerShell module. If you were to take a look at the scripts underneath, you'd notice that there are surprisingly few moving elements required to deploy resources to Azure!
To do a lift and shift operation (that is, run Dime.Scheduler 'as is' on the cloud), we need to identify the services on Azure that could replace the on-premise equivalents. Fortunately there is not so much we need to get started.
To learn more about our Azure recommendations, we recommend you read this article.
Deployed resources
The minimum requirements for Dime.Scheduler include a Windows operating system to host the (web / windows) applications and some databases to store the data. This is reflected in the resources that can be deployed to Azure with this installer:
- Azure Virtual Machine
- Network Interface Card
- Public IP Address
- Disk
- Network security group
- Virtual network
- SQL Server (Azure SQL)
- Dime.Scheduler database
- Dime.Scheduler back office
- Azure Service Bus
This organization is clearly visible in the installer's GUI. Each column (Azure VM, Azure SQL database, Azure Service Bus) is optional, enabling you to host Dime.Scheduler partially in the cloud and partially on-premise. We don't necessarily recommend this hybrid hosting model but it is certainly an option.
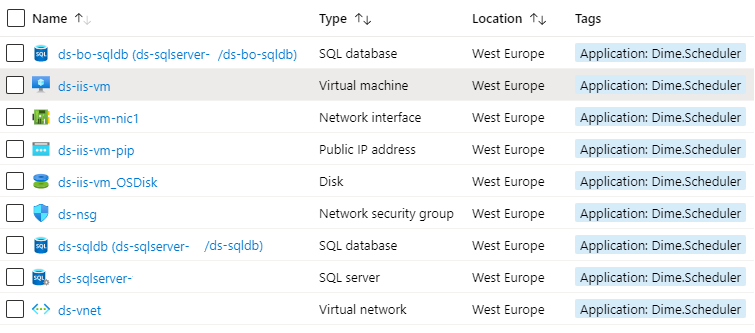
Here is an example of what the resources look like once deployed on Azure:

Some of these resources are deployed automatically because other resources depend on it. For example, a virtual machine needs a network interface card, public IP address and disk, so we will include them in the deployment if you decide to deploy an Azure Virtual Machine.
Azure configuration
When we take a closer look at the configuration items in the Azure tab, you will find that a lot of information has already been filled out by default. Let's start with the resource group.
Resource group
A resource group is a container that holds a range of resources together. This allows for easier management, reporting, billing, tagging, etc. Every resource on Azure needs to be assigned to a resource group.
For the resource group name, we recommend the following naming convention: ds-[ENVIRONMENT NAME]-rg where 'ds' stands for Dime.Scheduler and 'rg' stands for resource group. If you deploy multiple instances on Azure, it will be easy to make mistakes so we highly recommend you give the environment name a clear and concise name like 'test' or 'production'.
The following characters are allowed the resource group name:
- Numbers
- Lowercase letters
- Dashes
Next you have to decide in which Azure region you want to deploy your resources. Your choice of region has an important effect on performance, availability of services, billing, security and local laws. Even though there are many considerations, it's probably best to pick a region that is closest to you. You would need a good reason to explain to your client why you deployed Dime.Scheduler on a data center in Brazil if they are based in the town of Yorkeys Knob in the Land Down Under.
In the following sections, we will see which resources can be deployed to this resource group:
- Virtual machine
- Azure SQL databases
Azure Virtual Machine
An Azure Virtual Machine is sufficient to run all the nodes in Dime.Scheduler, including the web applications and Windows services. The installation scripts will do most of the work but before we get there, some decisions need to be made. Specifically, the image and the size need to be selected 2.
Azure VM size and image
By default, the '2019 Datacenter' image is chosen with a 'Standard A2' size. We see no reason why you would want to choose a version any other than the latest. In contrast, we totally understand if you want to configure the size - and thus the performance level - of the VM. The default size is one of the smallest you can get on Azure and therefore also the cheapest. This is sufficient for testing purposes; for production you may want to choose a bit more horse power 3. This being Azure, you can always scale up and down the machine after this initial deployment. This can be done programmatically, automatically or manually via the portal (or any other way to access the Azure Resource Manager).
Azure VM naming convention
We recommend you keep the name of the VM as is. If you decide to change it, we recommend the following naming convention: ds-[VN NAME]-vm where 'ds' stands for 'Dime.Scheduler' and 'vm' stands for virtual machine.
The following characters are allowed:
- Numbers
- Lowercase letters
- Dashes
Security
Azure will create a default local administrator user account. If you decide to leave these values blank, the default credentials that we provide will be used:
- User: dimescheduler
- Password: @dmin!2020
We can't urge you enough to use your own credentials. If you do so, keep in mind that there are some username and password requirements.
Usernames can be a maximum of 20 characters in length and cannot end in a period ("."). The following usernames are not allowed: administrator, admin, user, guest, server, owner, adm.
These are the password requirements:
- Length between 8 - 123 characters
- Have lower characters
- Have upper characters
- Have a digit
- Have a special character
You can use the local administrator account to log in to the VM and do the installation of Dime.Scheduler. This account can safely be used to host the web applications and Windows services when the databases and back office systems are also deployed in the cloud.
While we are on the topic of security, port 3389 is opened by default so administrators can remote into the virtual machine. This is not a best practice so it is recommended to remove the firewall rule as soon as the installation of Dime.Scheduler has been completed. Note that this rule has been set on the resource in Azure (available in the portal under the 'Networking' blade of the virtual machine), not in the virtual machine itself.
More advanced solutions - which go well beyond the responsibilities of Dime Software - can be devised to secure the machines. For example, an Azure VPN Gateway can be deployed to connect the on-premise network with the Azure virtual network. Or if you want to go all the way, you could check out ExpressRoute.
Azure SQL databases

When the Azure SQL checkbox is ticked, the installer will deploy a Azure SQL server and two Azure SQL databases. Specifically, it will create two single databases.
The Azure SQL databases can be accessed with the credentials of the VM user.
Azure SQL naming convention
We propose the following naming convention for the database names: ds-[name database]-sqldb where 'ds' stands for 'Dime.Scheduler' and 'sqldb' stands for SQL database.
Collation
Collations in SQL server are useful when you want specific behaviors for things like sorting and case sensitivity. By default, we selected the SQL_Latin1_General_CP1_CI_AS collation but you are free to change this 4.
Azure SQL size and image
The next two options are important because they will determine the capacity and performance of the databases. Similar to the VM, we chose for pretty basic specs by default and they are perfect for testing purposes. But for production, you will want to pump up those rookie numbers. Again, this being Azure, you can always scale the database(s) after this initial deployment. This can be done programmatically, automatically or manually via the portal (or any other way to access the Azure Resource Manager).
Deployment
When you click the deployment button, a PowerShell window will be opened. You may be prompted to install or execute a PowerShell module. After a few seconds you need to log in to Azure and choose a subscription to deploy these resources to. After you've done this, it will take about 15 minutes to complete the deployment (during which you don't have to lift a finger).
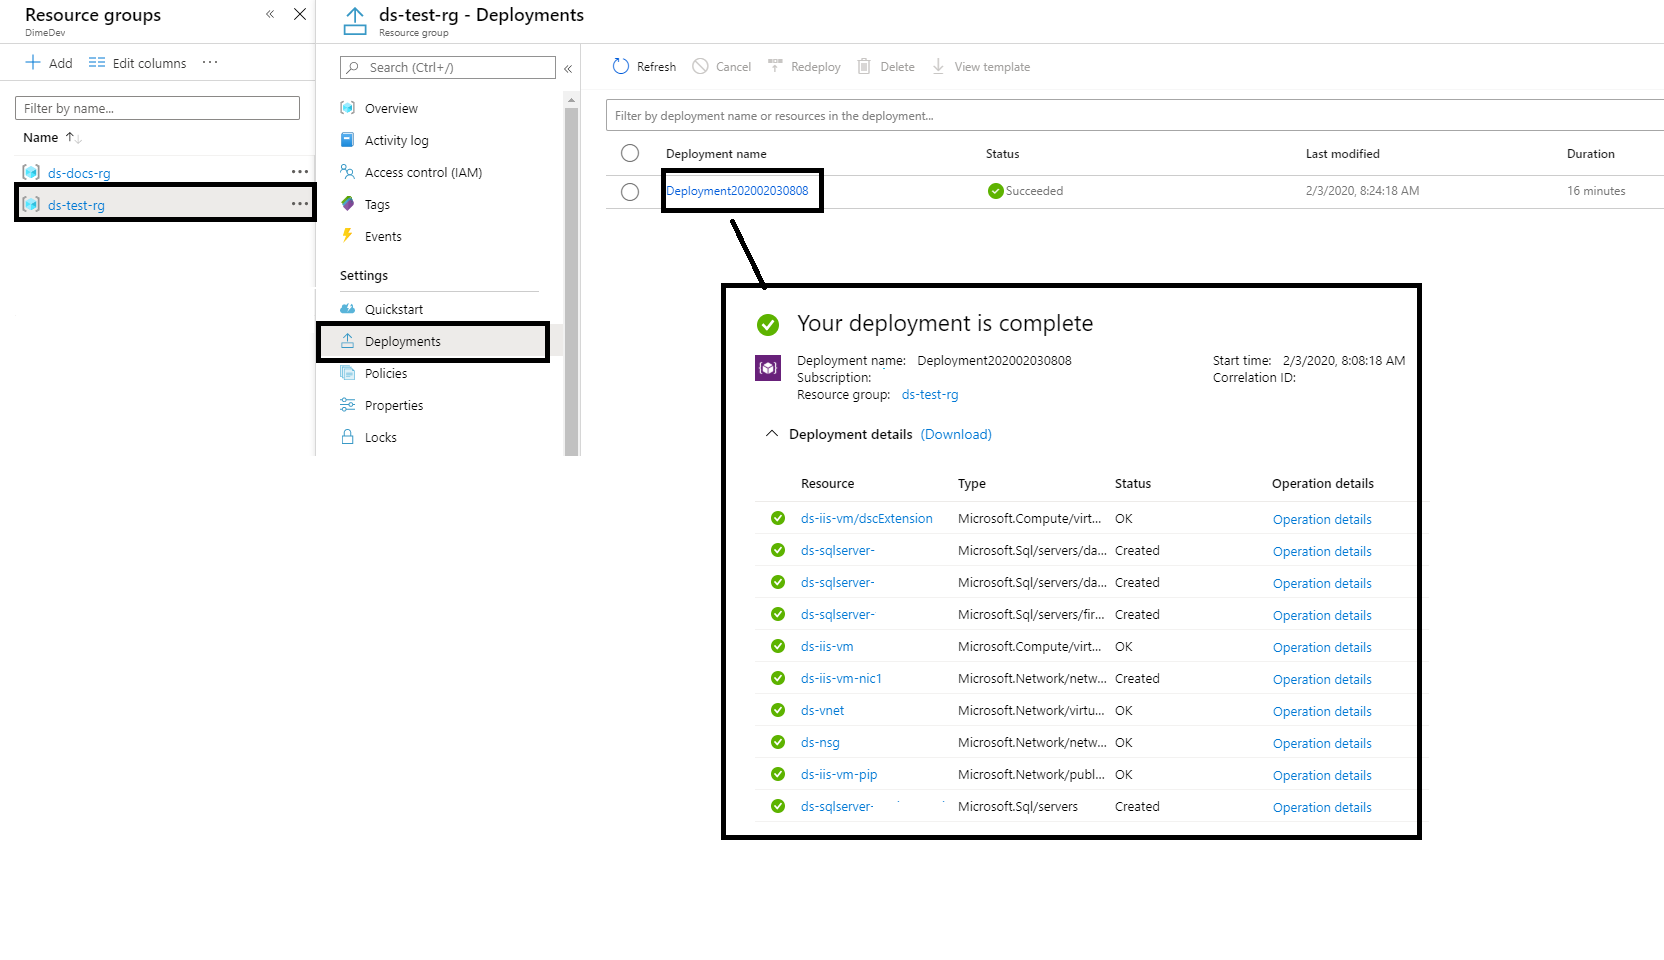
You can also check progress on the Azure portal. Head over to the right subscription and look for the resource group you are creating:

You will notice the 'dscExtension' task takes most time. This is normal though - the necessary Windows features are activated in this task - so be patient until the task's done. After this task, the deployment will be completed and the installer can be closed (and copied to the virtual machine that was just created).
- The list of images changes constantly. Check out this Microsoft doc to get the latest information.↩
- For more information on image sizes, click this link. Don't forget to check out our Azure recommendations.↩
- Check out the official SQL server docs for a detailed explanation on the subject.↩